▀ ▀ ▀ ▀ ▀
✓ Recommended For:
This 6wk velocity pitching program was developed for pitchers seeking to redefine to increase their velocity AND command it. There are three components to mound production - pitch quality, velocity, and command. This program improves all three. Although there are varying aspects to age specific pitching development, this program takes into consideration your (1) age and (2) future pitching requirements.
▀ ▀ ▀ ▀ ▀
1.0 Specifications:
» Age: 9 & up.
» Level: Pro to Youth.
» Type: Pitching.
» Sport: Baseball only.
▀ ▀ ▀ ▀ ▀
2.0 Requirements:
» Intensity: Abide by program directives to ensure proportionate recovery & workload rates.
» Equipment: Program requires usage with prescribed equipment for maximum results.
▀ ▀ ▀ ▀ ▀
3.0 Recovery & Injury Prevention Guidelines:
→ If you experience extended soreness during this program: ←
✓ Cut back on rep amounts or intensities FIRST.
✓ Cut back on drill amounts SECOND.
✓ If soreness still persists, take days off & then start again THIRD.
✓ If you experience sharp pain or injury, seek medical advice or stop the program until re-evaluation.
✓ Athletes actively in season must carefully monitor recovery rates.
▀ ▀ ▀ ▀ ▀
1.0 Development Team:
» Developer: VPX Baseball.
» Consultants: Jim Parque (MLB player & current trainer), Sean Taunt (NCAA baseball coach), Allan Wirtalla (MLB strength coach), Gerard Cressey (kinesiologist),
Simeon Walker (baseball analytics), and Kyle Antonelli (pro pitching coach).
▀ ▀ ▀ ▀ ▀
2.0 Program Overview:
Over 15 years of data, research, and on field results have gone into this program's development. A complete pro grade velocity enhancement program that teaches you how to throw harder, command it, and improve your pitch quality. Developed from MLB experience and expertise, this program has eight separate training components per day. Each componenet develops important aspects of pitching, as this is not just a velocity program.
▀ ▀ ▀ ▀ ▀
3.0 Performance Benefits:
» Philosophy: Teaches MLB pitching mechanics, velocity, and command.
» Mechanical Fixes: Targets linear & rotational hip movements, arm stroke pathway, and power pitching requirements.
» Improvements: Focused upon impact pitching that wins at all levels.
▀ ▀ ▀ ▀ ▀
✓ Directives:
This VPX Velocity Pitching Program lasts 8 weeks. Start at the beginning of the program for best results. Program is sectioned into two phases that last four weeks each. Each day, you will complete 8 different training components (described below). Each component training circuits that target specific hitting skills. Complete each training component IN ORDER: (1) Warm Up, (2) Shadow Drills, (3) Velocity Enhancement, (4) Pitching Training, (5) Cardio Management, (6) Strength Program, (7) Arm Care, and (8) Course Work.
▀ ▀ ▀ ▀ ▀
1.0 Training Components:
» Warm up: Gets your body ready for day's workload.
» Shadow Drills: Dry drills that improve your kinetic chain reaction.
» Velocity Enhancement: Power throwing, long toss, & pulldowns.
» Pitching Training: Teaches command, off speeds, & pitch quality.
» Cardio Management: Your daily speed, agility, & cardio plans.
» Strength Program: A pitching specific strength program.
» Arm Care: Keeps your rotator cuff, scapula, and shoulder in peak performance.
» Course Work: Insights into what it takes to pitch at any level.
→ The following are explanations of the acronyms utilized within this program that denote usage, intensity, and effort directives. ←
▀ ▀ ▀ ▀ ▀
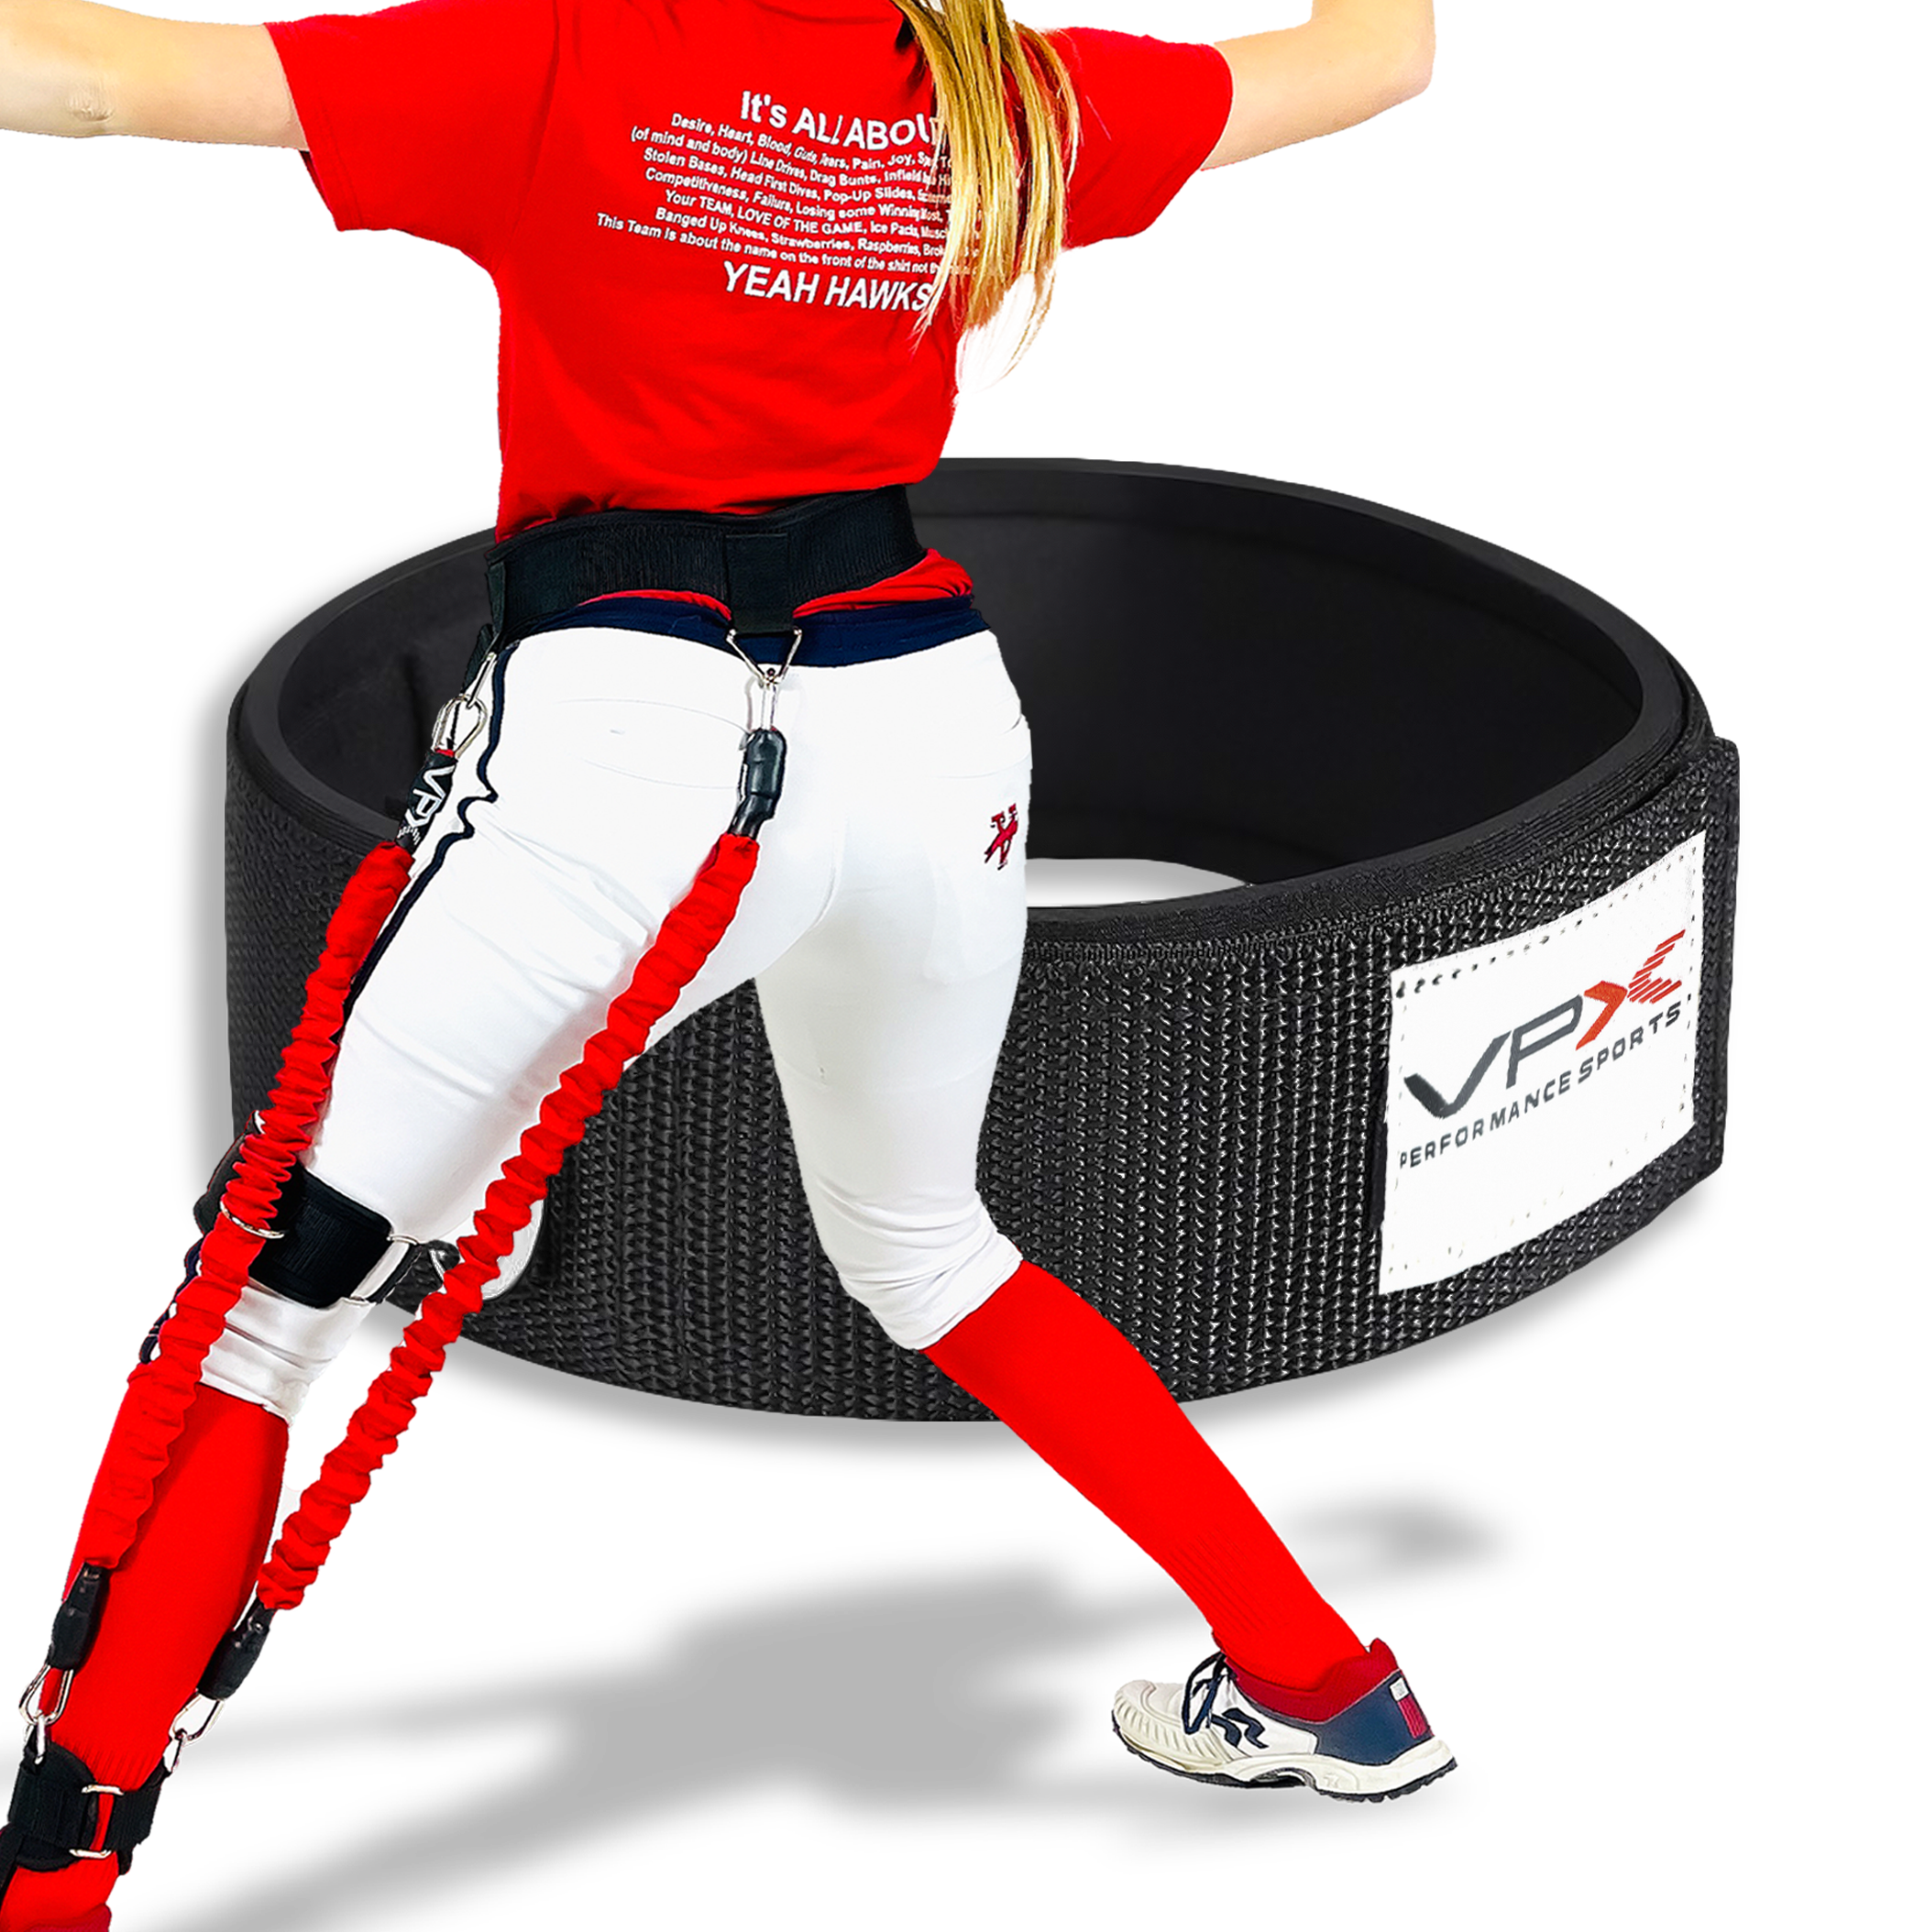
(BH) Back Hip VPX Training Harness Usage:
1. Put the VPX Training Harness foot strap on your back foot and secure.
2. Strap the VPX Training Harness waist belt over your belly button and secure.
3. Make sure the belt's D-rings are located on the bottom of the waist belt and pointed downwards. Ensure the belt is snug around your waist.
4. Position the waist belt D-rings to be located on your (1) back hip and (2) middle of your back. There are 2 D-rings sewn into the waist belt.
5. Attach one bungeee to the waist belt D-ring located on your back hip. Clip the bottom of this bungee to the D-ring (of your foot strap) located on the outside of your back foot's ankle.
6. Attach the second bungee to the waist belt D-ring located in the middle of your back. Clip the bottom of this bungee to the D-ring (of your foot strap) on the inside of your back foot's ankle.
7. Ensure there is little to no sag of your waist belt. A little sagging is okay, but too much sagging requires tightening of your waist belt.
▀ ▀ ▀ ▀ ▀
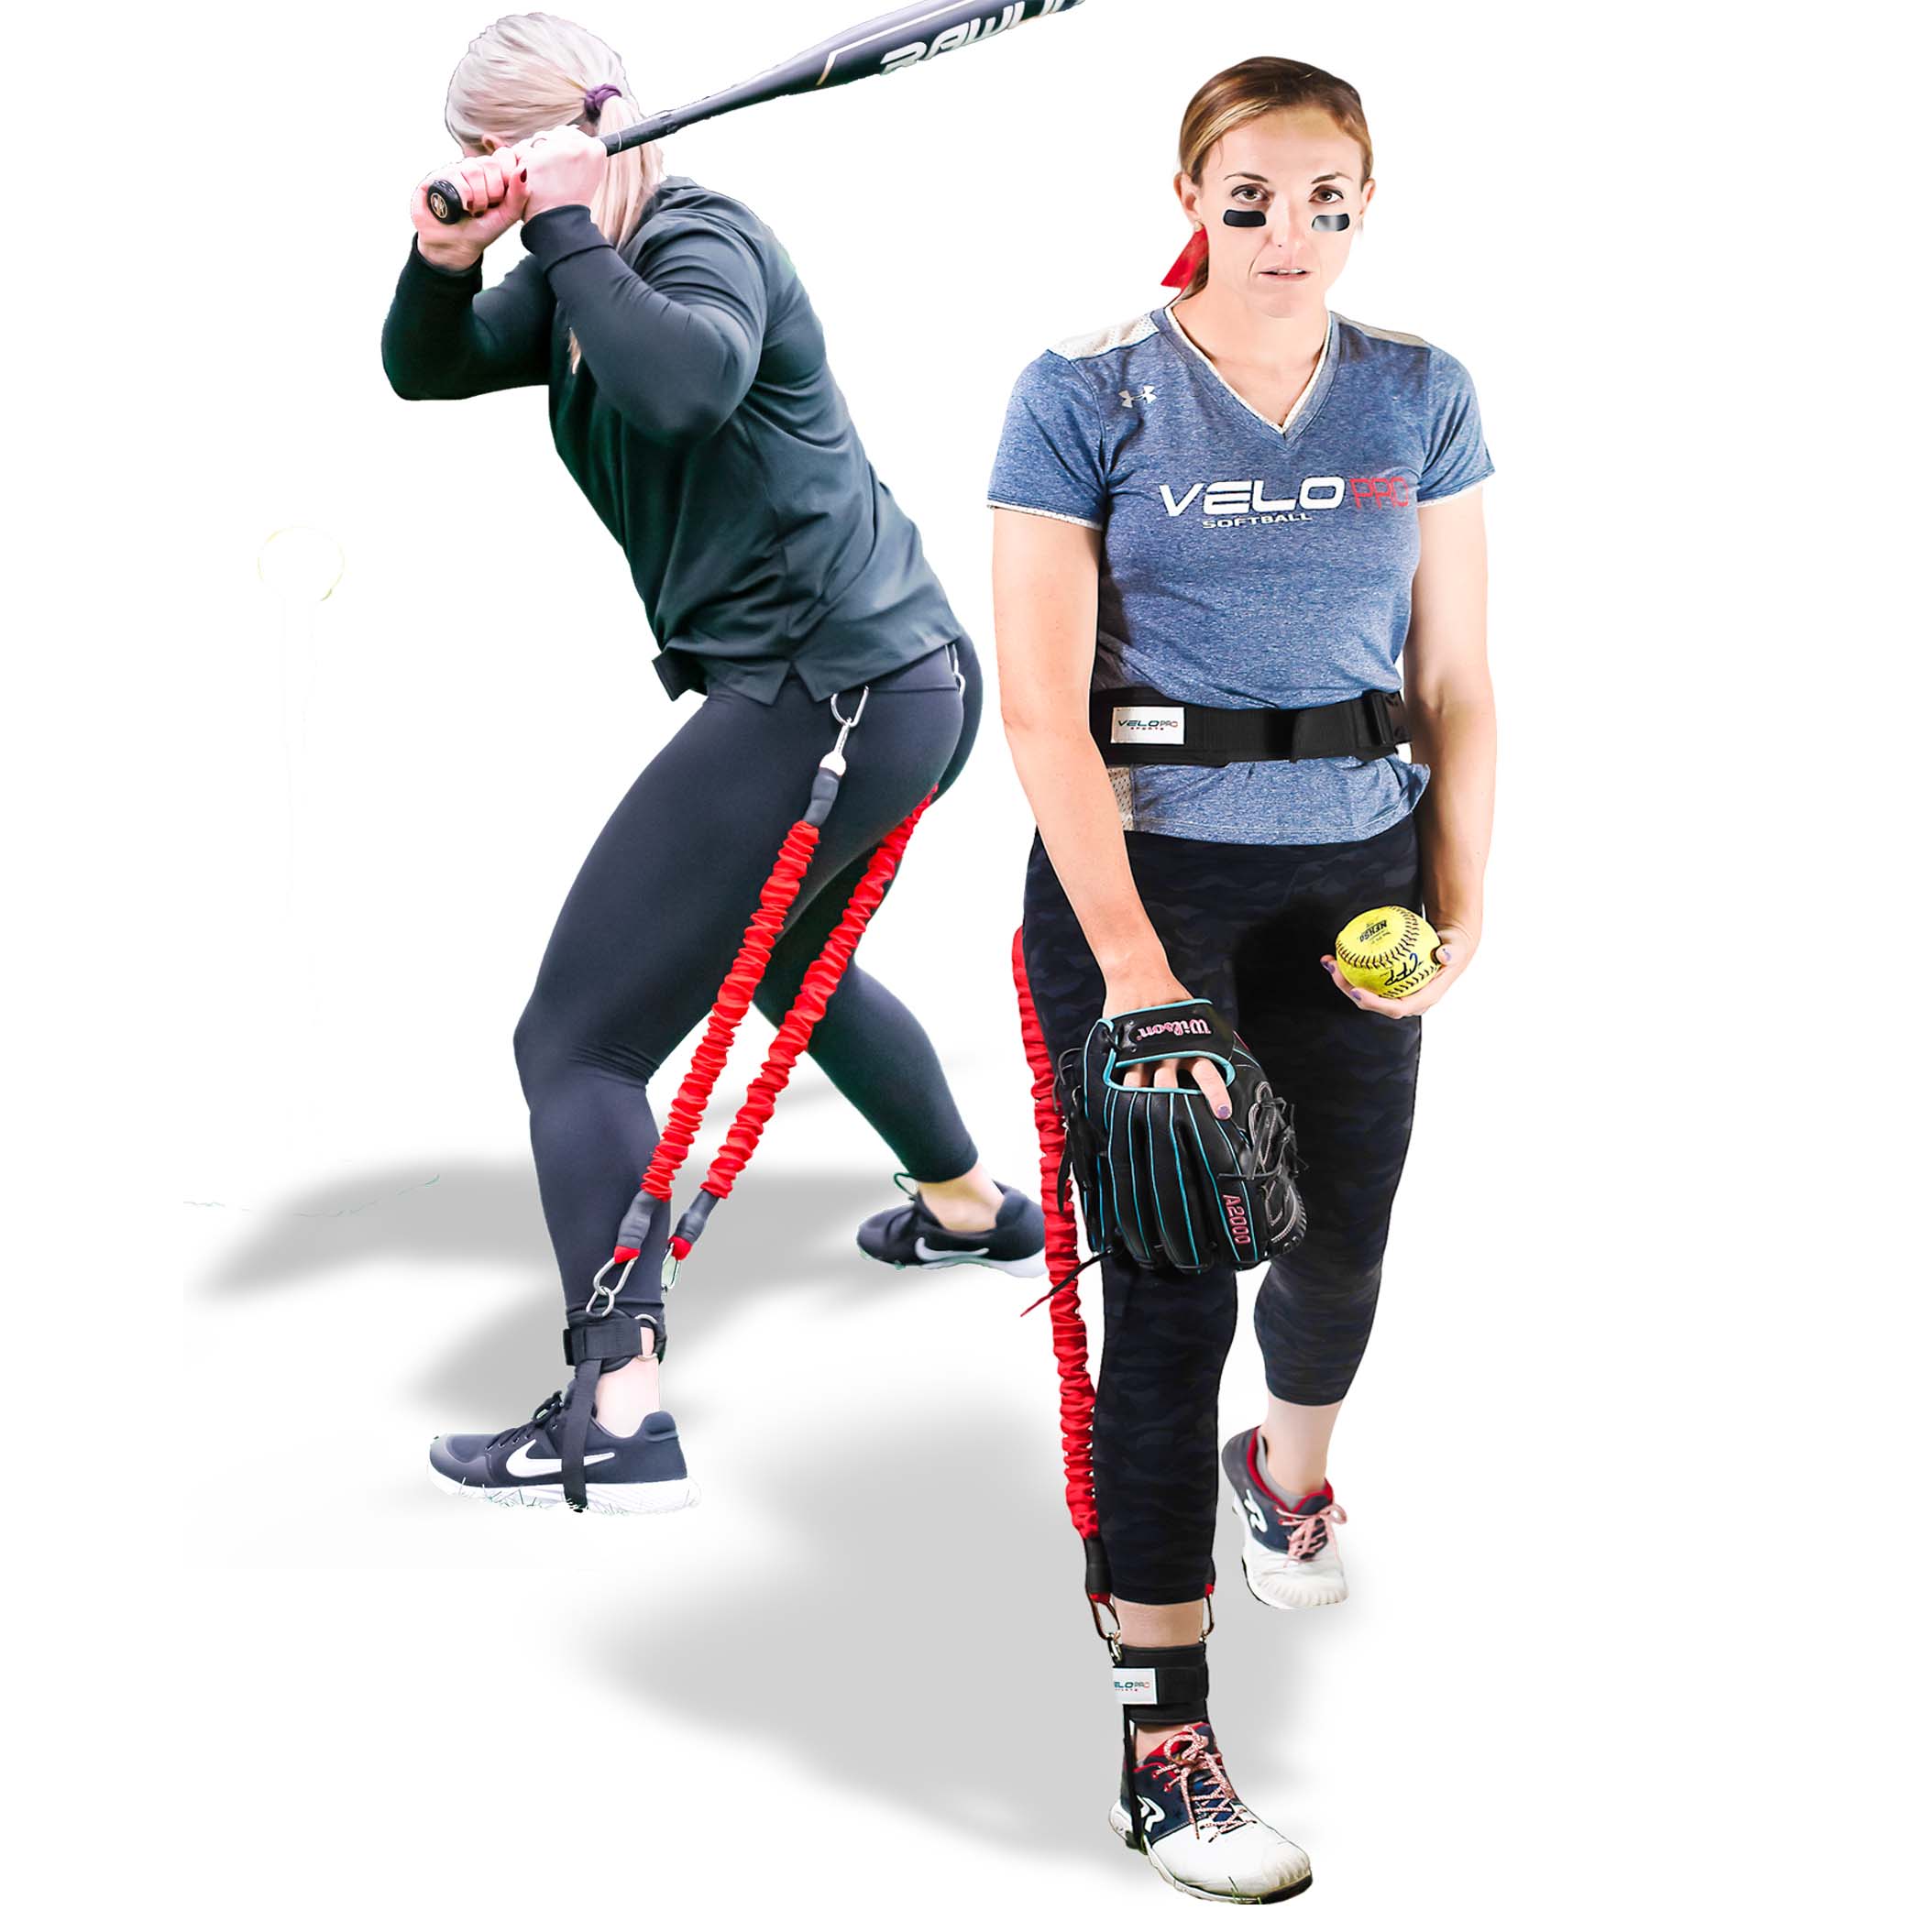
(FH) Front Hip VPX Training Harness Usage:
1. Put the VPX Training Harness foot strap on your front foot and secure.
2. Strap the VPX Training Harness waist belt over your belly button and secure.
3. Make sure the belt's D-rings are located on the bottom of the waist belt and pointed downwards. Ensure the belt is snug around your waist.
4. Position the waist belt D-rings to be located on your (1) front hip and (2) middle of your back. There are 2 D-rings sewn into the waist belt.
5. Attach one bungeee to the waist belt D-ring located on your front hip. Clip the bottom of this bungee to the D-ring (of your foot strap) located on the outside of your front foot's ankle.
6. Attach the second bungee to the waist belt D-ring located in the middle of your back. Clip the bottom of this bungee to the D-ring (of your foot strap) on the inside of your front foot's ankle.
7. Ensure there is little to no sag of your waist belt. A little sagging is okay, but too much sagging requires tightening of your waist belt.
▀ ▀ ▀ ▀ ▀
(PEL) Perceived Effort Level:
The amount of effort or intensity level per rep. 100% is max intensity pitching. 90% are controlled high intensity swings. 80% are medium intensity swings that feel your hands throughout their entire ROM. 70% are phase specific swings that feel your entire swing’s movement planes
▀ ▀ ▀ ▀ ▀
Clipped or Unclipped:
» Clipped: Refers to actively having your VPX Training Harness bungees clipped for either (BH) or (FH) usage - as described above.
» Unclipped: Refers to unclipping all VPX Training Harness bungees so that you are not actively training with any harness resistance.